It seems like it’s been a while since I’ve posted about a cake! Last week, I made a cake for Thomas’ friend Jess. Thomas requested a cake with a female soccer player on top and the words “Go Bucs” and “Go Gators” on the sides. I made the soccer girl using the Frozen Buttercream Transfer method so this seems like a great opportunity to post a tutorial on the topic! I’m calling this the June tutorial because I didn’t find time to post one yet…I know, I’m a day late, but you’ll forgive me, right?
First, here’s the cake: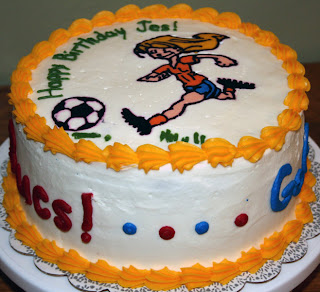


And now for the tutorial! The photos were taken while I made the Gators Stethoscope Cake, but the technique was the same for this cake.
First of all, you need to find your pattern There are so many good patterns on the internet – just do a Google search for whatever you’re interested in. Tape your pattern to a piece of cardboard and then tape a piece of plastic wrap or acetate on top of that.
Hint #2: Think about which way you want your design to face on your cake. When you use this technigue, you’re working backwards. The front of your design is actually down on the plastic wrap/acetate so be sure your design is facing the opposite way you want it on the cake.
Outline your design in whatever color you choose. I decided to outline this one in black so that all the borders and lines really stand out. Remember, you can use your paint brush (which has only been used for food prep – not painting!) to correct any small mistakes you make. At this point, you can place the entire project in the freezer for 10-15 minutes so that the borders get stiff.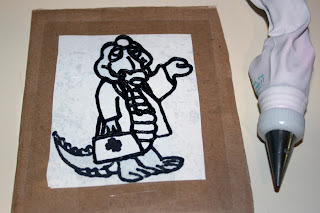
Next, fill in the areas – just like you’re coloring in a coloring book! Some tutorials recommend that you start with the smallest areas first. I just fill in all of one color at a time, and then move on to the next color. The key when filling in the area is to keep your piping tip burried in the icing so that all the spaces are filled. Be careful not to move your outlines though! This technique is a little tricky in that you can’t see your finished product until you’re, well…finished! Remember that the top of your design is actually the bottom now so you have to work kind of blindly. Just do your best to fill in all the spaces, we can check on it when you’re finished filling in the entire area. If you find that your borders start moving, don’t be afraid to put the project in the freezer again for another 10 minutes.
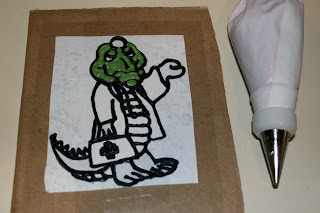
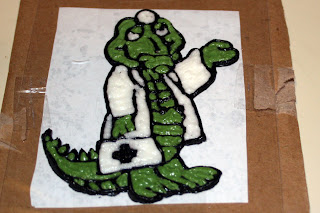
Ok, you’ve finally finished filling in the entire pattern. Congrats! Now, let’s check your work. If you used acetate, this step is very easy. If you used plastic wrap, be careful here. Untape the bottom and both sides of the acetate/plastic wrap, and carefully lift the design. You should be able to see if there are any small holes in your icing. If you see holes, lower the design and fill them in by applying more icing or gently moving the icing with your paintbrush. Keep lifting and fixing until you no longer see any holes.

Tape the design back in place. I like to stick the whole thing in the freezer at this point – just long enough so that the icing gets stiff. When you take it back out of the freezer, spread a small amount of icing over the whole design. Don’t get too close to the edge because you don’t want this icing to show on the front. The point of this step is to “glue” the whole design together. Up until now, you’ve used different colored icings which are essentially different puzzle pieces. If you were to try to remove the design, you’d probably get multiple pieces, rather than the whole thing.
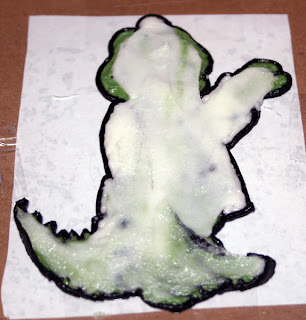
Again, put the project in the freezer, but this time leave it for 30 minutes to an hour. During this time, ice your cake and get it ready for your design.
Remove your pattern from the freezer and work rather quickly to transfer it to your cake. Untape all 4 sides and carefully flip the pattern over onto your cake.


As always, your tutorials make it seem so easy! Great looking cake, too.